Fresh out of the oven. Kids are starting to swarm.
Fresh out of the oven. Kids are starting to swarm.
2.0 hours
8 servings
Adjust servings
One loaf is about 1.5 lbs, so 8 servings would be 8 3oz slices.
1/32
1/8
3/8
1/4
1/16
5/16
3/4
1/2
1/8
5/8
1 1/2
13/16
1/4
1 1/4
3
1 5/8
5/16
1 1/2
3 3/4
2 1/32
3/8
1 7/8
4 1/2
2 7/16
dairy-free
gluten-free
(?)
Has gluten from:
bread flour
kid friendly
has meat
has pasta
has seafood
mediterranean
vegan
vegetarian
pescatarian
paleo
(?)
Not paleo due to:
bread flour
This recipe has no customizations.
Bon Appétit
This recipe fits right into a balanced diet.
Nutrition Rating Details
Here are the percentages used to determine the nutritional rating for this recipe:
• Calcium: 0.0% of RDA
• Calories: 9.3% of RDA
• Carbs: 13.6% of RDA
• Fat (total lipid): 1.4% of RDA
• Fiber: 4.5% of RDA
• Fructose: 0.0% of RDA
• Protein: 5.5% of RDA
• Sodium: 24.4% of RDA
• Sugar: 0.4% of RDA
• Vitamin A (IU): 0.0% of RDA
• Vitamin B6: 1.0% of RDA
• Vitamin C: 0.0% of RDA
• Iron: 0.0% of RDA
• Magnesium: 3.2% of RDA
• Manganese: 8.2% of RDA
• Niacin: 21.8% of RDA
• Potassium: 1.5% of RDA
• Zinc: 3.0% of RDA
If all nutritional components are less than 50% of RDA
(and all vitamins and minerals are less than 400% of RDA)
the recipe gets a “Bon Appétit” rating.
Please provide succinct feedback on why this substituion looks like it may not be correct.
E.g.:
It looks like a mistake.
It won't work for 99% of recipes.
Error: we need a reason for your feedback.
Thank you for the feedback! (We'll check it out...)
PREPARATION
Blooming Your Yeast
1.
I like to bloom my yeast prior to using it. The foodious recipe for "Homemade Pizza Dough" has details on this step - though if you're confident your yeast is viable, you can skip this step.
2.
If you do decide to bloom the yeast, add (a) 1/4 tsp of yeast (b) a 1/4 tsp of sugar and (c) 1/8 cup of warm water to a bowl and let it sit for 10 minutes. The yeast should become a little frothy and rise to sit on top of the water (the sugar is optional, it will make the yeast bubble up a little, so it's more obvious it's viable).
Making the Dough
3.
Combine the flour, yeast, and salt into a bowl or a mixer (I use a KitchenAid mixer, though I've also mixed by hand). Add the warm water. Mix the dough until it's sticky and tacky.
4.
NOTE: If you've bloomed your yeast, add 1.5 cups of water instead of 1 5/8 cups, as you've already used 1/8 of a cup of water for blooming.
5.
Put the dough into a large-ish bowl and cover with plastic wrap. Let the dough rest for 12-18 hours at room temperature.
Preparing the Dough for Baking
6.
You'll know the dough is ready when it's surface is dotted with bubbles. It will also have approximately doubled in size.
7.
Lightly flour a work surface, place the dough on it, sprinkle a little more flour on top, and fold the dough over on itself once or twice.
8.
Using just enough flour to keep the dough from sticking to everything (your fingers and your work surface), shape the dough into a ball.
9.
Coat a cotton towel generously with flour and put the dough seam side down on the towel, then dust the top with more flour.
10.
Cover this with another cotton towel and let it rise for an hour or two. You shouldn't see a lot of rising here, unless your work surface is very warm and/or your kitchen is very warm.
Baking the Dough
11.
Pre-heat your oven to 450 degrees F. Put a large pot that has it's own cover into your oven as it's heating (this can be cast iron, pyrex, ceramic, etc).
12.
When your oven is hot enough, take the pot out of the oven, remove the top cotton towel, slide your hand underneath the cotton towel with the dough on it and gently turn the dough over above the pot so it falls into the pot.
13.
Bake this for 30 minutes with the cover on the pot.
14.
After 30 minutes, either remove the lid from the pot, or continue to bake the bread on a baking rack until it's color is deep brown. This should take 15-30 minutes.
15.
Remove the loaf from the oven and let it cool on a rack.
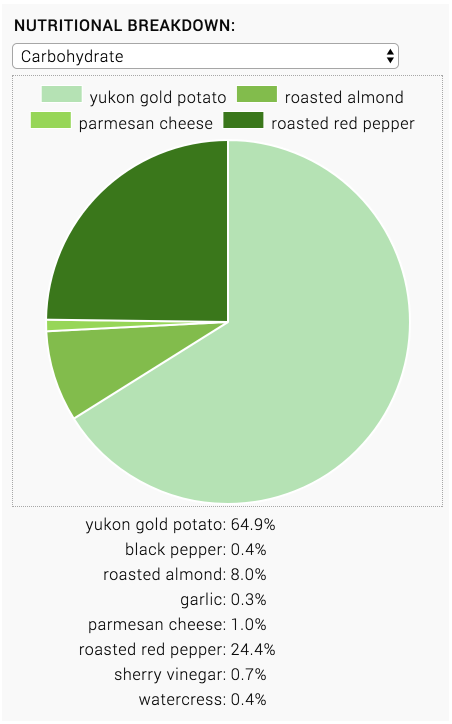
The sample chart shows the nutritional data that is typically shown for any given recipe.
The chart shows both nutrition totals as well as per-ingredient nutrition.